
Installing A Battery Monitor In A Camper Van Conversion
Welcome to the world of maintenance! Unfortunately, electrical systems in a campervan conversion are not a set-and-forget install no matter how much you plan. Because much of your lifestyle relies on the health of your batteries, it’s important to monitor them. That’s when a battery monitor comes in handy.

- Bluetooth communication
- Easy to install and program
- Voltage, current, amp-hours consumed
- State of charge, power consumption (Watts)
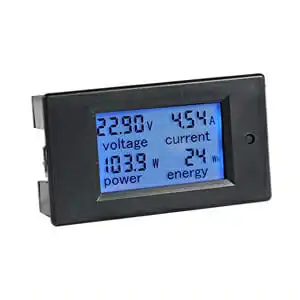
- Displays voltage, current, active power, energy
- Display and shunt included only (no wires or accessories)
Measuring Battery Charge
Let’s first look at what can’t be measured realistically from a battery. If you were handed a lead acid battery off the street, it would be quite difficult to tell how “full” it is on the spot. There isn’t a measurement that you can take to that can tell you this. You’d need to be able to let it sit for 12 hours to balance and level out as well as have a machine that can load test it or use a hydrometer if you’re lucky enough to be handed an FLA battery.
That scenario isn’t common though, so let’s look at it when you’re in control of more variables. The next logical step is to fill the battery all the way up as a starting point, then keep track of how many Amp-hours are used to know how full your battery is at any point in time. This is similar to counting how many cups of water are being poured out of a full container to know when it’ll be empty.
To be sure the battery is 100% full, you need to give it a 3-stage charge and let it sit for 12-24 hours without being used. This lets the internal cells balance out properly, assuming they’re all in good condition.
After that’s done, you measure the Amps that are put in and taken out over a period of time to know how Amp-hours are in your battery. For instance, if you have a 100Ah battery and your battery monitor measures 25Ah taken out, then you would know that you have 75Ah left in that battery. This is the basic theory for most battery monitors you see on market.
Measuring Batteries Doesn’t Sound too Bad, Right?
Where this method breaks down is that while it’s relatively easy to measure Amps going through a system at any given instant, trying to count those Amps over a period of time is difficult to do with lead acid batteries. Most battery monitor systems lose their accuracy and utility after a short period of time. The reason is that lead acid batteries’ efficiency varies due to things like temperature, size, discharge rate, age, etc. So trying to total the number of Amps being absorbed when you don’t know how efficiently they are being absorbed is nearly impossible.
Again, this isn’t much different than trying to measure how much water is coming out of a container using measuring cups. But the size of the container changes with temperature and how fast you’re pouring, and you don’t know how much you’re spilling, but you are sure you’re spilling a little bit.
More expensive battery monitors do take some of these variables into account. Some have temperature sensors and can be programmed for specific chemistries of batteries. But in the end, this is just delaying the inevitable inaccuracy. They might be relatively accurate after 3 days or a week, but they’re still not going to give you a very good picture of how “full” your batteries are after constant use. After that time, you need to re-set the batteries like discussed before: disconnecting them and letting them sit for 24 hours after a proper full charge.
What Can A Battery Monitor Measure?
Let’s step back here and look at the big picture. The main goal of a battery monitor is to help keep your batteries healthy. Knowing that you can’t accurately measure how full they are without some rather inconvenient steps, you can change your mindset to keeping the batteries “good enough”. You aren’t maintaining multi-million-dollar military defense systems, so you can handle a bit of estimation – and don’t have a choice, really!
Measuring Voltage:
Keeping track of the voltage of your system is the most useful thing you can do! The voltage can quickly tell you many things and prevent you from damaging your batteries. With a simple voltage reading anywhere you can:
- Estimate battery capacity. Lead Acid batteries sit at about 12.7V when full and at about 12.1V when they’re at 50% discharged. This does vary. For instance if you’ve been drawing a lot of load from them they might read 12.0V, but if you let them sit they’ll recover to 12.1V. But the main point is that you can get a decent feeling for when your batteries are nearing the 50% mark and curb your electrical usage to that reading.
- Prevent over-discharge. When your batteries are reaching the 11.8V setting, you know that you are dangerously close to damaging your batteries. You can even wire in a low-voltage disconnect from you system to automatically disconnect the batteries. Draining them all the way can easily cause irreversible damage, so keeping track of voltage is important for this.
- Know when your batteries are charging. Lead acid batteries won’t ever naturally sit at above 12.7-12.8V, so when the voltage reading is higher you know that your solar system or alternator is indeed functioning and connected.
- Be able to recognize when something is wrong. Your voltage should be in a small window at any given time, so just by glancing at a reading you can quickly diagnose issues. If your voltage is over 14.1V or doesn’t change when your alternator is running, then you know you’ve got to fix something.
Measuring Amps
As noted, counting amps accurately over a period of time is really difficult to do. But counting instantaneous amps is quite useful. Remember, your system voltage is fairly constant 12V, so you can measure amps to see how much electricity is running through the wires. Here are some locations you can measure amps traveling around your wires:

- Total system amp use. This can give you a good estimate of how quickly your batteries are being used or charged, which in turn is good for estimating how long they’re going to last. This is a “net total” location. For example, if you’re bringing in 13A from your charge controller and using 16.5A in your system it will read at 3.5A. Often you need two displays to measure current in both directions
- Individual component draw. With an ammeter on your positive fuse box, you can measure how much power each of your components are using. This is good for simple curiosity reasons (how much power is my fridge actually using?), as well as recognizing combinations of electrical usage. You might realize, for instance, that at night with a vent fan and lights on, you’re eating up more juice than you’d like so you can turn the lights off. Or you might be seeing .5A coming through when nothing should be.
- Power coming from solar. By measuring how much power is coming from your solar panels, you can get an idea of how much sun your panels are getting and how well your panels are working. You can put a meter on this yourself, but many mid-tier and top-tier charge controllers already tell you how many watts of solar they’re getting. Using the charge controller’s built in monitor saves you the need for installing one yourself.
- Power coming from alternator. You can also measure how much charge your batteries are getting from your alternator. This way you can see how much your driving is helping your batteries.
Any combo of the above is a useful measure depending on how curious you are and how critically you are keeping track of your batteries.
Once the system is in place, the most utility will come from the relative changes. If you normally see 3.5A coming from your fridge and suddenly see it at 1.5A, you know that something is wrong and can start diagnosing the issues.
Specific Gravity:
If you’ve chosen flooded batteries (rather than AGM or Lithium), you have a great extra tool- a hydrometer- that can really help you maintain your system! These are quite accurate and useful, although it does require access to the batteries and being careful about the caustic liquid inside. There is a video with instructions about this in our battery charging article.
How To Measure Volts And Amps:
Devices To Measure Volts
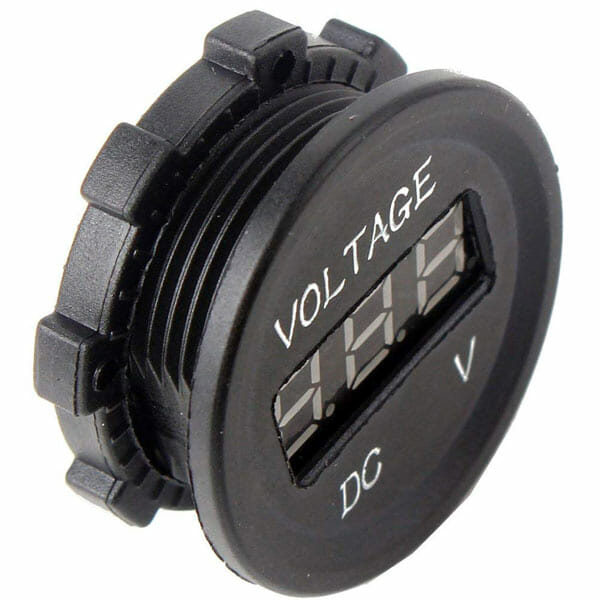
Voltage is the easiest to measure. In fact, it’s so simple and cheap that many electrical devices like inverters throw in a voltage reading on a screen in addition to their main function. That being said, sometimes it’s nice to have a dedicated voltage screen, especially on smaller systems that don’t have any other meters on them.
There aren’t really too many special things to consider when picking out a voltmeter. We find that round holes are easier to cut than square ones, so we recommend this basic digital voltmeter.
Alternatively, you can install a 12V cigarette socket to give you charging options, and then plug in a voltmeter. Both of these options can be wired into a spare slot in your fuse box to get the system voltage.
- Bluetooth communication
- Easy to install and program
- Voltage, current, amp-hours consumed
- State of charge, power consumption (Watts)
Devices To Measure Volts And Amps
Amps have two options for measuring. As said above, most systems use the voltage drop over a shunt to see how much electricity is being used. These systems can be fairly cheap as well as cost a fair amount depending on the brand and functions.
The main downside to shunts is that they are adding a resistance to the negative circuit. In theory, adding a resistance on your return (-) wires – exactly where the shunt is placed – is bad practice because it means that in certain circumstances your fuses might not work properly. In reality, this resistance is so small that major respectable companies such as Victron don’t think it’s an issue, but it is something to point out. Here is our choice for a basic ammeter.
- Displays voltage, current, active power, energy
- Display and shunt included only (no wires or accessories)
This monitor is good for instant amps in any wire that you have. It does have a reading for total Wh used, but as was said earlier, this won’t be very accurate after a day or two.
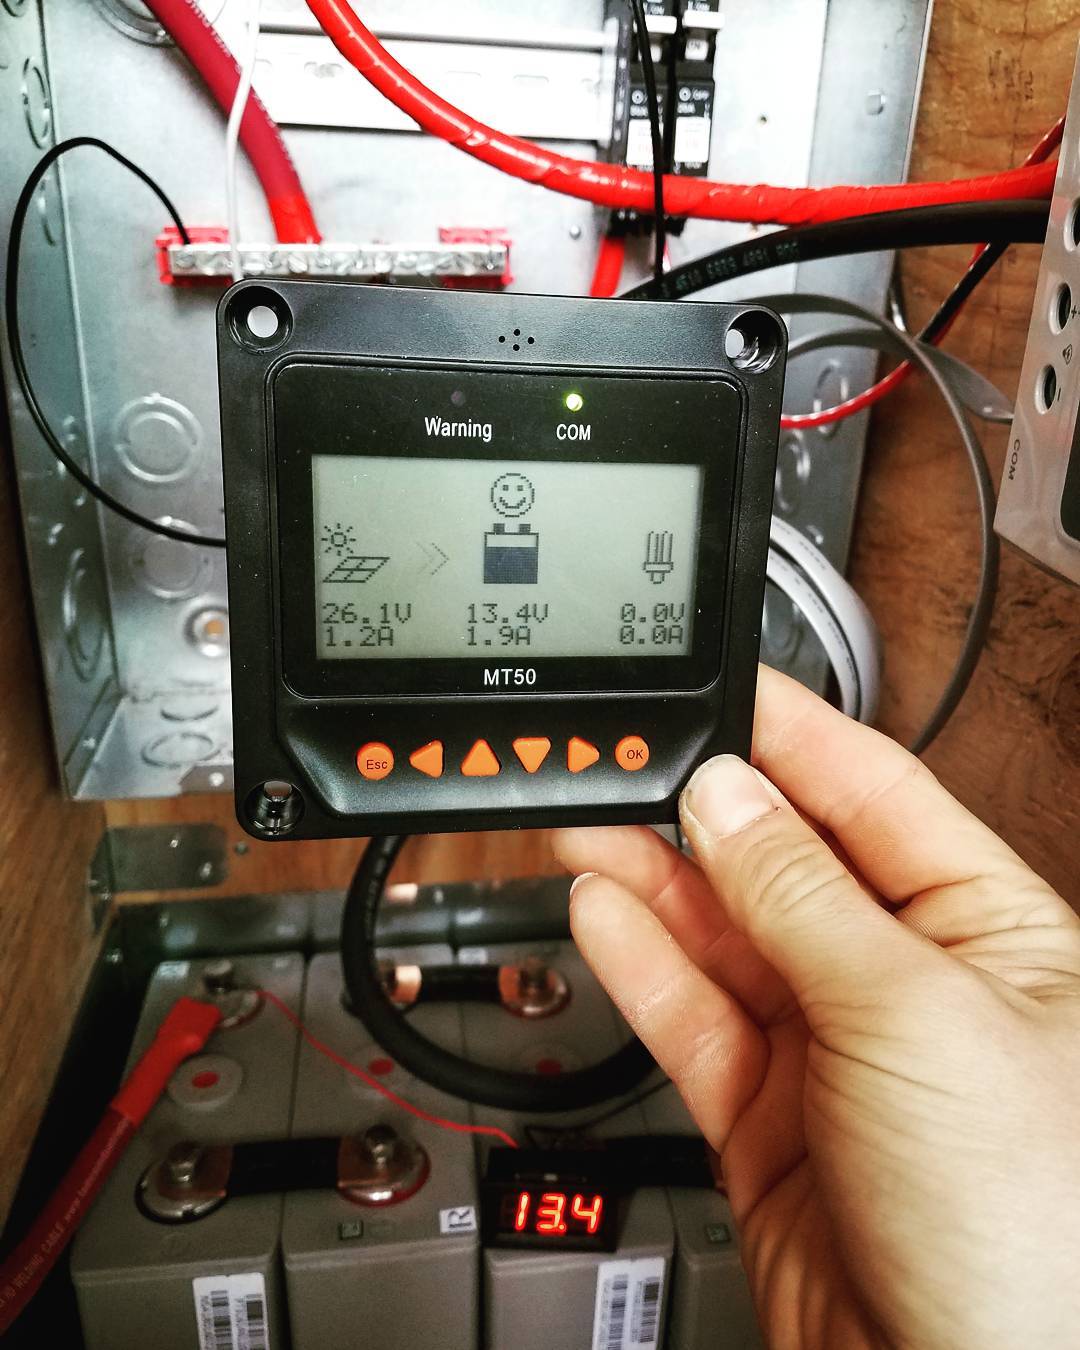
The Victron ammeter upgrade is most commonly used for more expensive installs. It’s still a shunt based system, but has some more accuracy built it. The biggest advantage is the built in Bluetooth capabilities, which allow you to monitor and customize the system from your phone. The manufactures of these systems both have good documentation on how to install them.
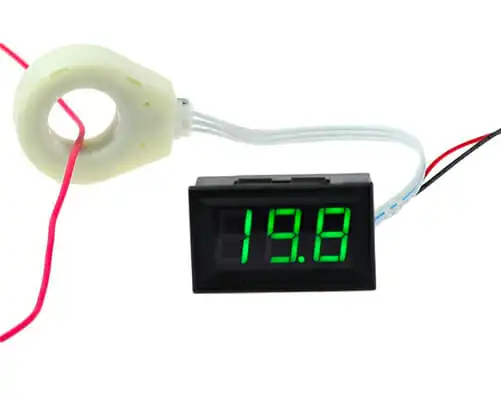
Hall Effect Sensor
An alternative metering device is to use a Hall Effect sensor. This is a less intrusive device that doesn’t interrupt your return (-) circuit. It is a ring that is placed around your wires that measures the change in magnetic field by electricity passing through it. The downside is that these are more difficult to count amps than a shunt (again, though, shunts based meters aren’t very accurate at this anyway). They can also be inaccurate up to 10% (usually closer to 0-5%) because of variations in wire thickness and surrounding environment.
Regardless of these drawbacks, the hall effect sensor is the type of measurement that we prefer. It’s easier to place it at different parts in your system if you only want a cheap meter. It is also the way that most Digital Multi Meters function to measure amperage. We use this meter as we aren’t expecting anything over 100A.
How do I wire the baylite battery monitor? Do you have a diagram?
I was thinking about mounting one but was concerned as how to find a plug to install the monitor power wire, you helped me out thanks.