
Installing A Camper Van Water System [Sink & Plumbing Diagrams]
A constant supply of water is probably the most important thing you are going to need in your campervan. Because you need to access this water multiple times a day it’s essential to find a system that works for you.
Some people who live in a van full time (like us) simply store water in containers and pour it into a bottle when needed. Others develop entire systems with heated water and showers!
This article is a overview of common methods to carry water to help you decide which system you will want to use.
Things To Consider When Storing Water
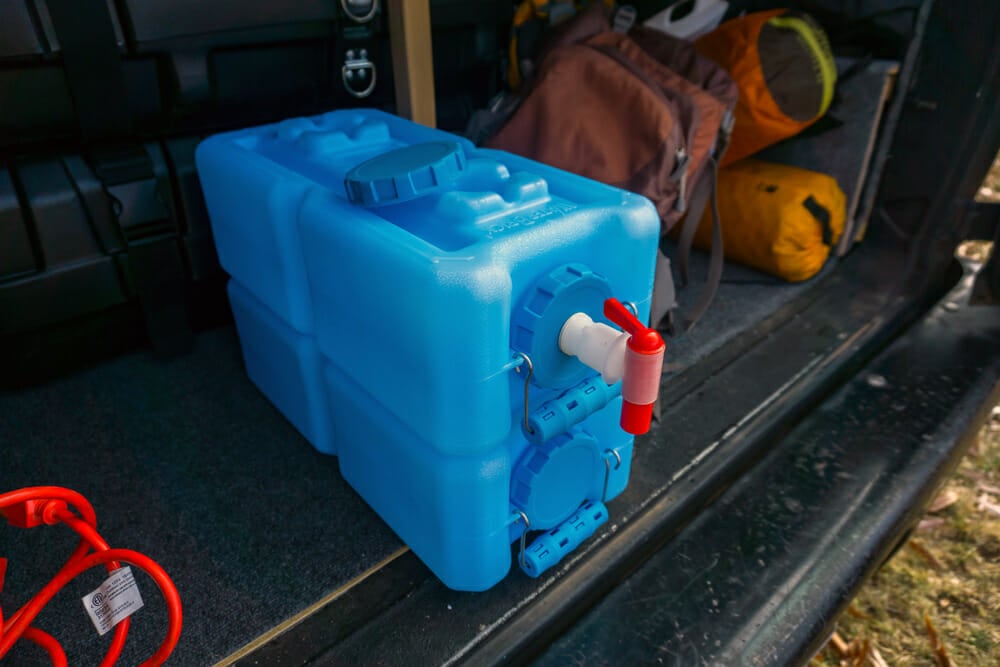
Water storage is the one of the universal necessities for vanlife. So it’s important to get it right. At a minimum, you should be packing at least one gallon of water per person per day. That is not taking into account cooking, cleaning and any pets you’re bringing along. Storing water can be as simple as packing a few inexpensive plastic jugs. 7-gallon Aqua-Trainer containers and 5-gallon Hedpack water tanks are two of the most popular types.
Weight of the tank and ease of access
You also need to consider whether you are physically able to move or fill the water containers. It makes no sense to pack a 5-gallon tank of water if you’re unable to lift nearly 50lbs.
1 gallon of water weighs a touch over 8 lbs. (3.78kg)
If you will be moving water containers in and out of your vehicle, we recommend choosing a tank that is 5-gallons or smaller. If you have larger containers, it makes sense to store them in a way that they will be easily accessible from a hose. Place your water container near a door or entry point. Look for tanks that have handles so they can be easily moved. Filling a large container can be made easier with the help of a food-safe hose and connector. These connectors are made of rubber and designed to fit snugly on campground spigots.
Health of the container
Not all freshwater tanks are created equal. Read the specs on your tank carefully and choose one that uses an FDA-approved material. The same is true for any tubing or plumbing you plan to add. Not all tubing is food-safe.
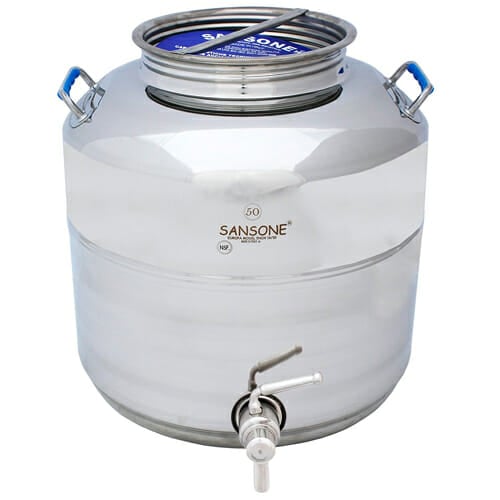
Some people choose not to store their water in plastic containers at all. In those cases, stainless steel water tanks are available.
Where to refill water
Luckily, clean water is relatively easy to find. The smaller your water container, the easier it will be to refill at grocery or hardware stores. For larger containers, many National Parks or State Forests will have visitor centers with water spigots.
Campgrounds are an easy place to find water, and sometimes city visitor centers will have water spigots available as well. When it comes to paid options, most Walmarts have water refill stations inside (near the ice up front) that can be used for $0.37 per gallon.
Filtering and Treating Water
If you choose to do a lot of boondocking or camp too far off-grid, it’s a good idea to carry an emergency water filter. Sawyer mini water filter and MSR MiniWorks are two choices that will allow you to filter water from any lake or stream and use it as drinking water.
You can also buy iodine tablets to sanitize questionable water or boil it for seven minutes to kill unwanted organisms.
What Is A Gray Water Tank?
A gray water tank stores any unused or waste water that comes from your fresh water tank. If you decide to build a campervan sink (or shower), a waste water tank will be necessary. These are most often stored underneath a sink but may also be stored beneath the vehicle. Gray water tanks do not have to be FDA-approved because you will not be drinking out of them.
We do not recommend draining gray water directly onto the ground from the van, however some people do choose to have plumbing running off of their gray water tank to the outside of their vehicle with a release valve for when you’re in an area that it’s appropriate to do so.
Use biodegradable soap when washing items in a van, especially if you’re dumping anything outside! And do not dump water in or near stream as all soaps are bad for aquatic life (even the biodegradable ones).
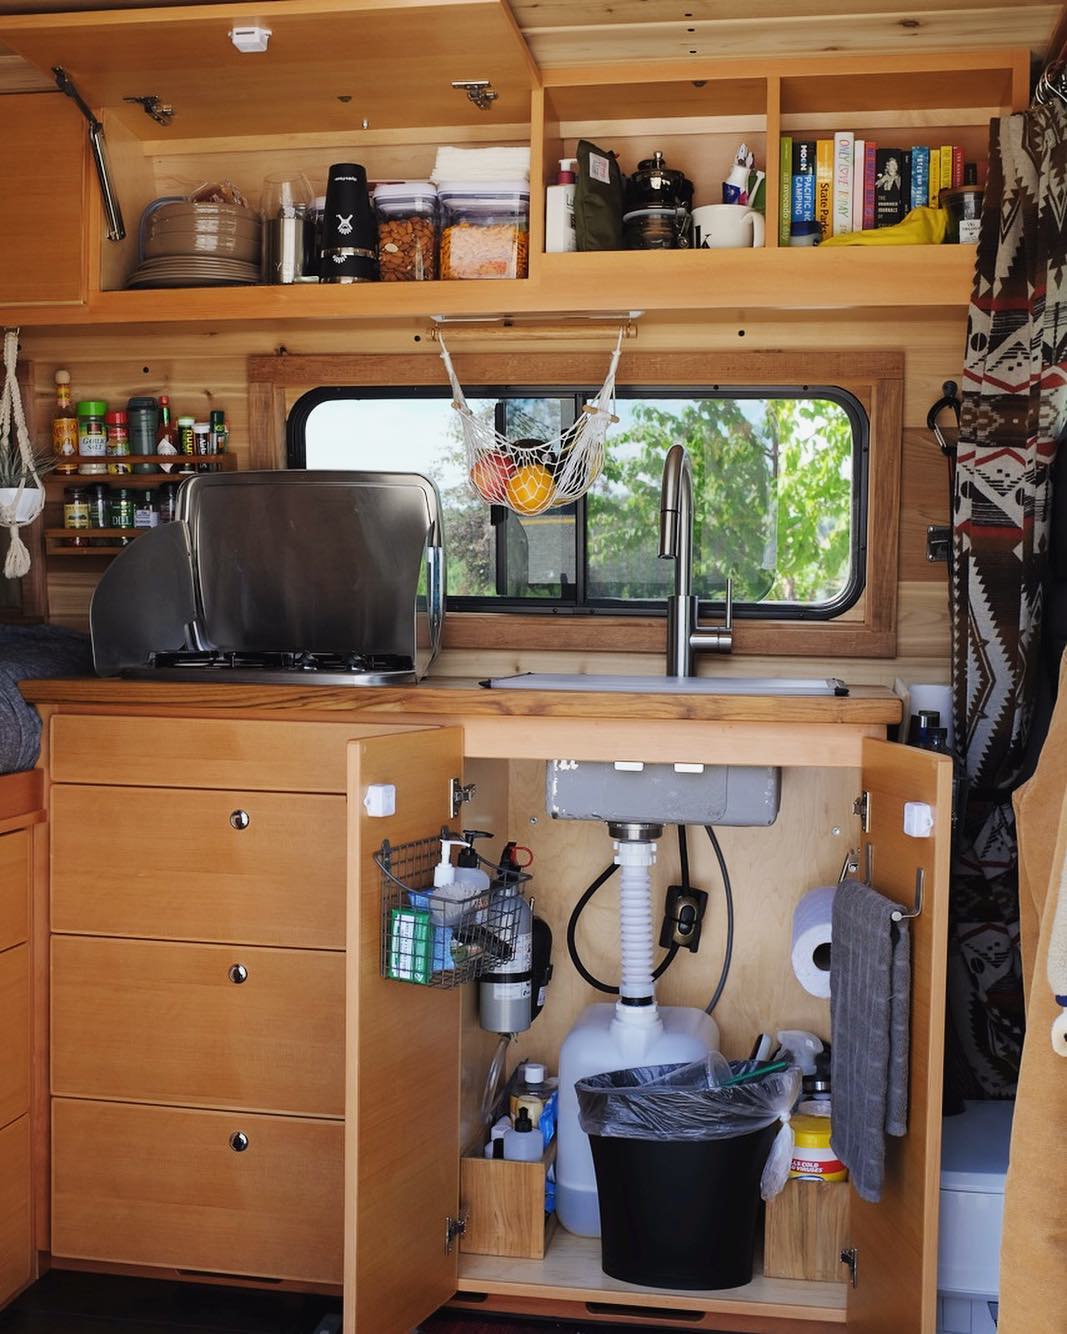
Installing a sink in your DIY campervan
If you have the space, installing a sink in your DIY campervan build is a good way to add a little extra comfort to van life. There are four main ways of getting water out of your container and into a cup or sink:
- Gravity-fed water system
- Manual hand pump
- Manual Foot pump
- Electric pump
Gravity-Fed Water System
Using the gravity-fed water system is the simplest and cheapest way to access water. There are little to no parts involved so you can count on it working every single time. We recommend finding a spigot that fits the top of your water container. Placing your container at a higher point than your sink or water bottle is all that it takes. Some people have even built showers out of the gravity-fed water system.
Keep in mind, water containers are heavy. Make sure your jugs are securely fastened so they don’t move around while driving.
Manual Hand Pump
A hand pump is another simple and inexpensive way to receive water. All it takes is a pump faucet and some flexible tubing. Pressure from the pumping mechanism will draw water up the tube and out of the faucet.
One of the more popular brands of hand pumps is the flipper pump by Whale Water Systems. Manual hand pumps take up a little less space than foot pumps and there is significantly less tubing required. They are also quite! As a downside, you will get little control over this water and the pressure is not always the strongest.
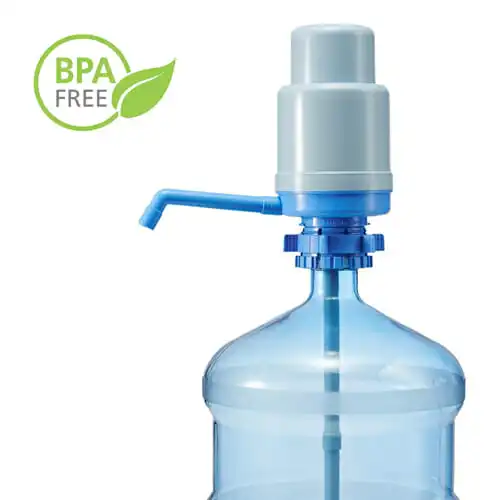
Hand pump that fits most 2-6 gallon water coolers. Includes pump Body, 4 tubes, sprout and cleaning brush. Manually operated. Extremely lightweight and portable.
The dolphin hand pump is a low-budget hand pump that comes with its own tubing built-in. This item will fit on any standard 5-gallon tank and works just like a soap dispenser. For a few dollars at Walmart, you can purchase a standard 5-gallon jug and fit this device on top.
Water containers like this one can be refilled or swapped out at any Walmart or grocery store for a small fee.
Manual Foot Pump Water System
Foot pump sinks involve a similar setup to the hand pump. They require only a few parts and if you purchase camper-specific pieces everything should fit together nicely. Foot pumps are easy to install and also very quite unlike an electric pump. The difference between a hand pump and a foot pump is you will get a little bit more control over the water flow as well as hands-free operation.
Manual Foot Pump Sink Parts
- 5-gallon Fresh Water + Gray Water Tank
- Spout Faucet
- Sink
- Strainer Drain
- Drain Tap with Hose
- Foot Pump
- Food Safe Tubing
- Hose Clamps
Campervan Foot Pump Plumbing Diagram
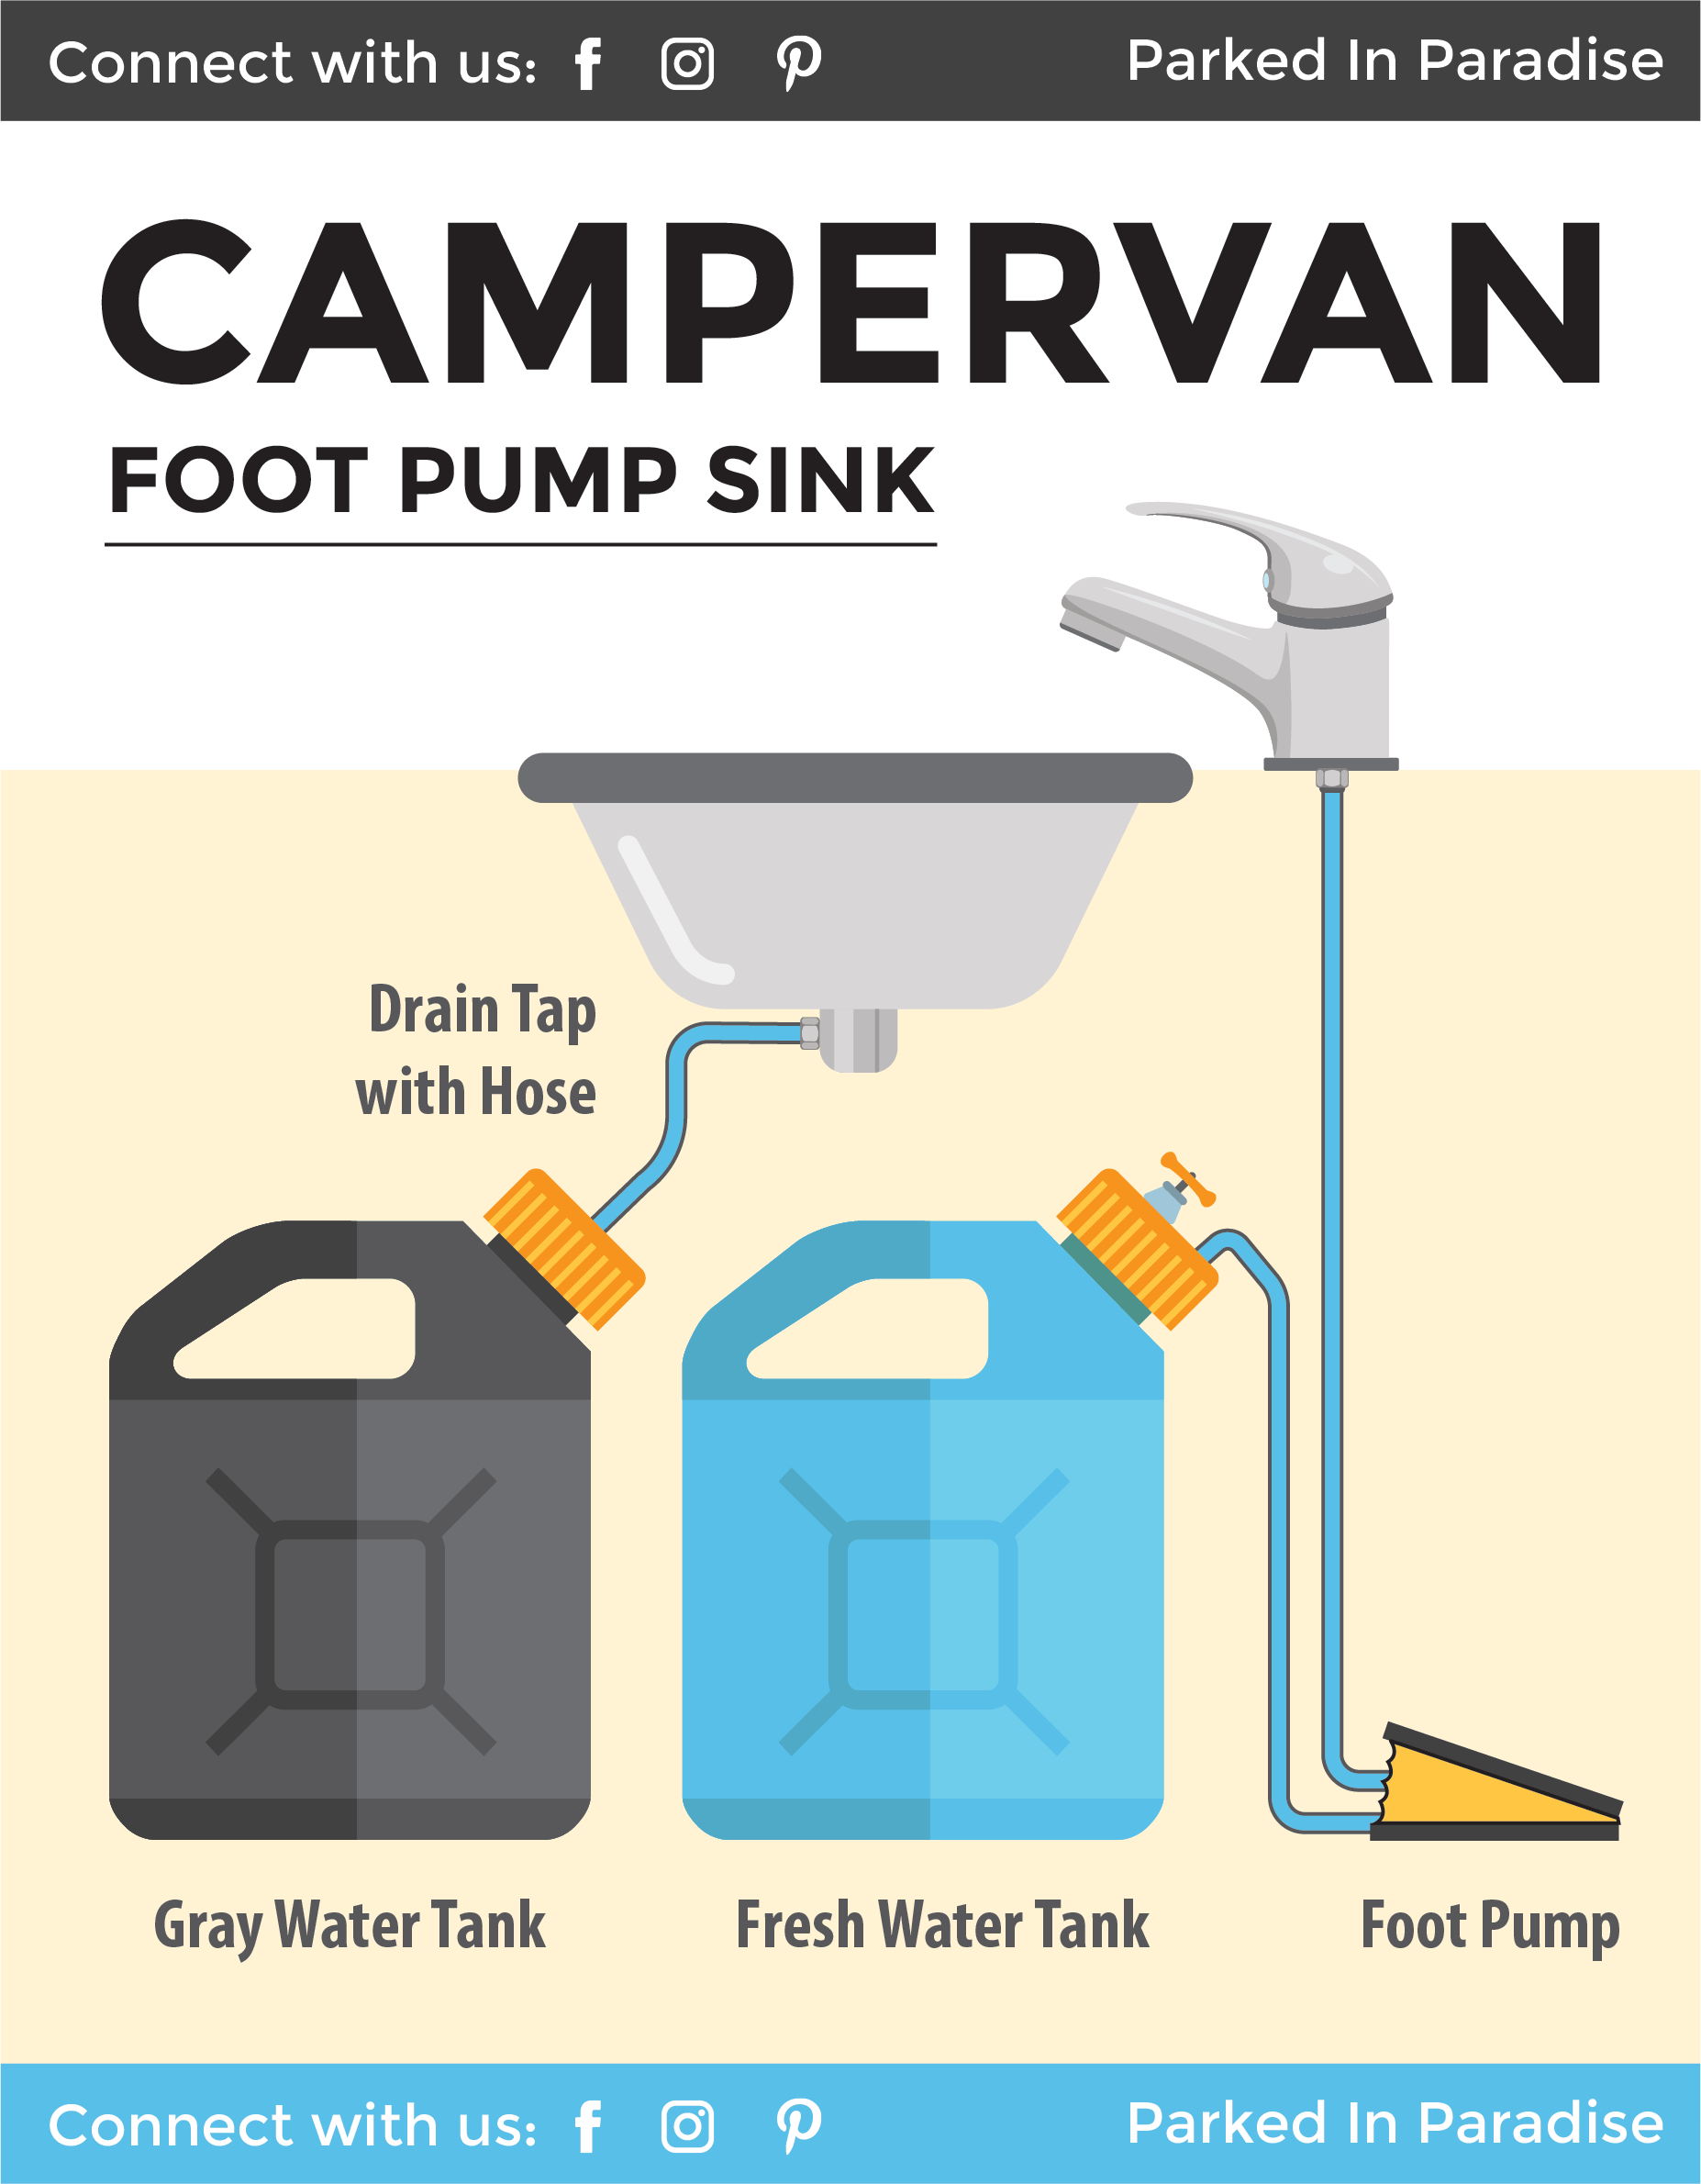
Manual Foot Pump Parts And Installation
Fresh and Gray Water Tanks
Fresh and gray water tanks should be securely fastened so they don’t slide around or spill while you’re driving. We recommending using straps to tie them down so they can be easily removed.
Spout Faucet
A spout faucet should come with a single water tap since there is no water heater built into this system. The spout faucet should be connected directly to the foot pump using .5″ tubing.
Sink
A steel sink can be purchased ready made, or you can build a DIY sink with an inexpensive steel mixing bowl. Most sinks come with a 2-2.5″ hole drilled in the bottom which will fit a standard strainer drain.
Strainer Drain
A 2-2.5″ strainer drain is mounted directly into the sink or bowl. Choose one with a strainer that can be closed to prevent any backsplash with frequent movements while driving.
Drain Tap with Hose
A drain tap acts like a mini-version of the U-pipe underneath your home sink. In a home, the U-shape creates a seal to prevent sewer gas from passing through the drain pipes. In a van, the miniature trap will prevent smells by allowing a small pool of water to form in the bottom.
The Camco camper drain tap will screw directly into a 2″ strainer drain and has a hose readily attached that can connect to your gray water tank.
Foot Pump
A manual foot pump should be mounted to the wall or floor and comes with a pedal and two connection points for food safe tubing. The first tube will lead directly to the faucet, and the second tube will lead into the fresh water tank. The Gusher Galley foot pump is one of the most popular pumps on the market. It’s two connection points fit .5″ flexible tubing. This foot pump can release 4.3-gallons of water per minute.
When purchasing a foot pump, keep in mind they come with either left-hand or right-hand levers. The difference is the position of the inlets and outlets for mounting.
Food Safe Tubing
Food-safe tubing will run from the pump into the fresh water tank and faucets. You will want to purchase .5″ flexible tubing. The tubing can be slipped directly onto the foot pump and faucet and secured with hose clamps.
12 Volt Electric Sink Pump
Building a 12-volt electric sink into your campervan is a great way to have a consistent supply of running water. This type of sink will make you feel the most at home and can also be hooked up to a hot water heater to make larger installations like showers.
Although an electric sink is not the simplest to install, it still only involves a few parts and requires just a small amount of electricity. The advantages of an electric sink include high and consistent water pressure as well as easy operation. As a con, an electric sink pump can be quite loud on its own. We recommend installing an accumulator (explained below) to save on noise and electricity.
Read our post on Best 12 volt Electric Sink Pumps for a Camper!
Parts of a 12 volt electric sink
- 20-gallon Fresh Water + Gray Water Tank
- Sink with Faucet
- Strainer Drain
- Drain Tap with Hose
- Water Pump
- Accumulator
- Food Safe Tubing
- Switch
- Hose Clamps
| Parts of a 12 Volt Electric Sink | |
|---|---|
 | 20-gallon Fresh Water + Gray Water Tank |
 | Sink with Faucet |
 | Strainer Drain |
 | Drain Tap with Hose |
 | Water Pump |
 | Accumulator |
 | Food Safe Tubing |
 | Switch |
 | Hose Clamps |
Campervan Plumbing Diagram
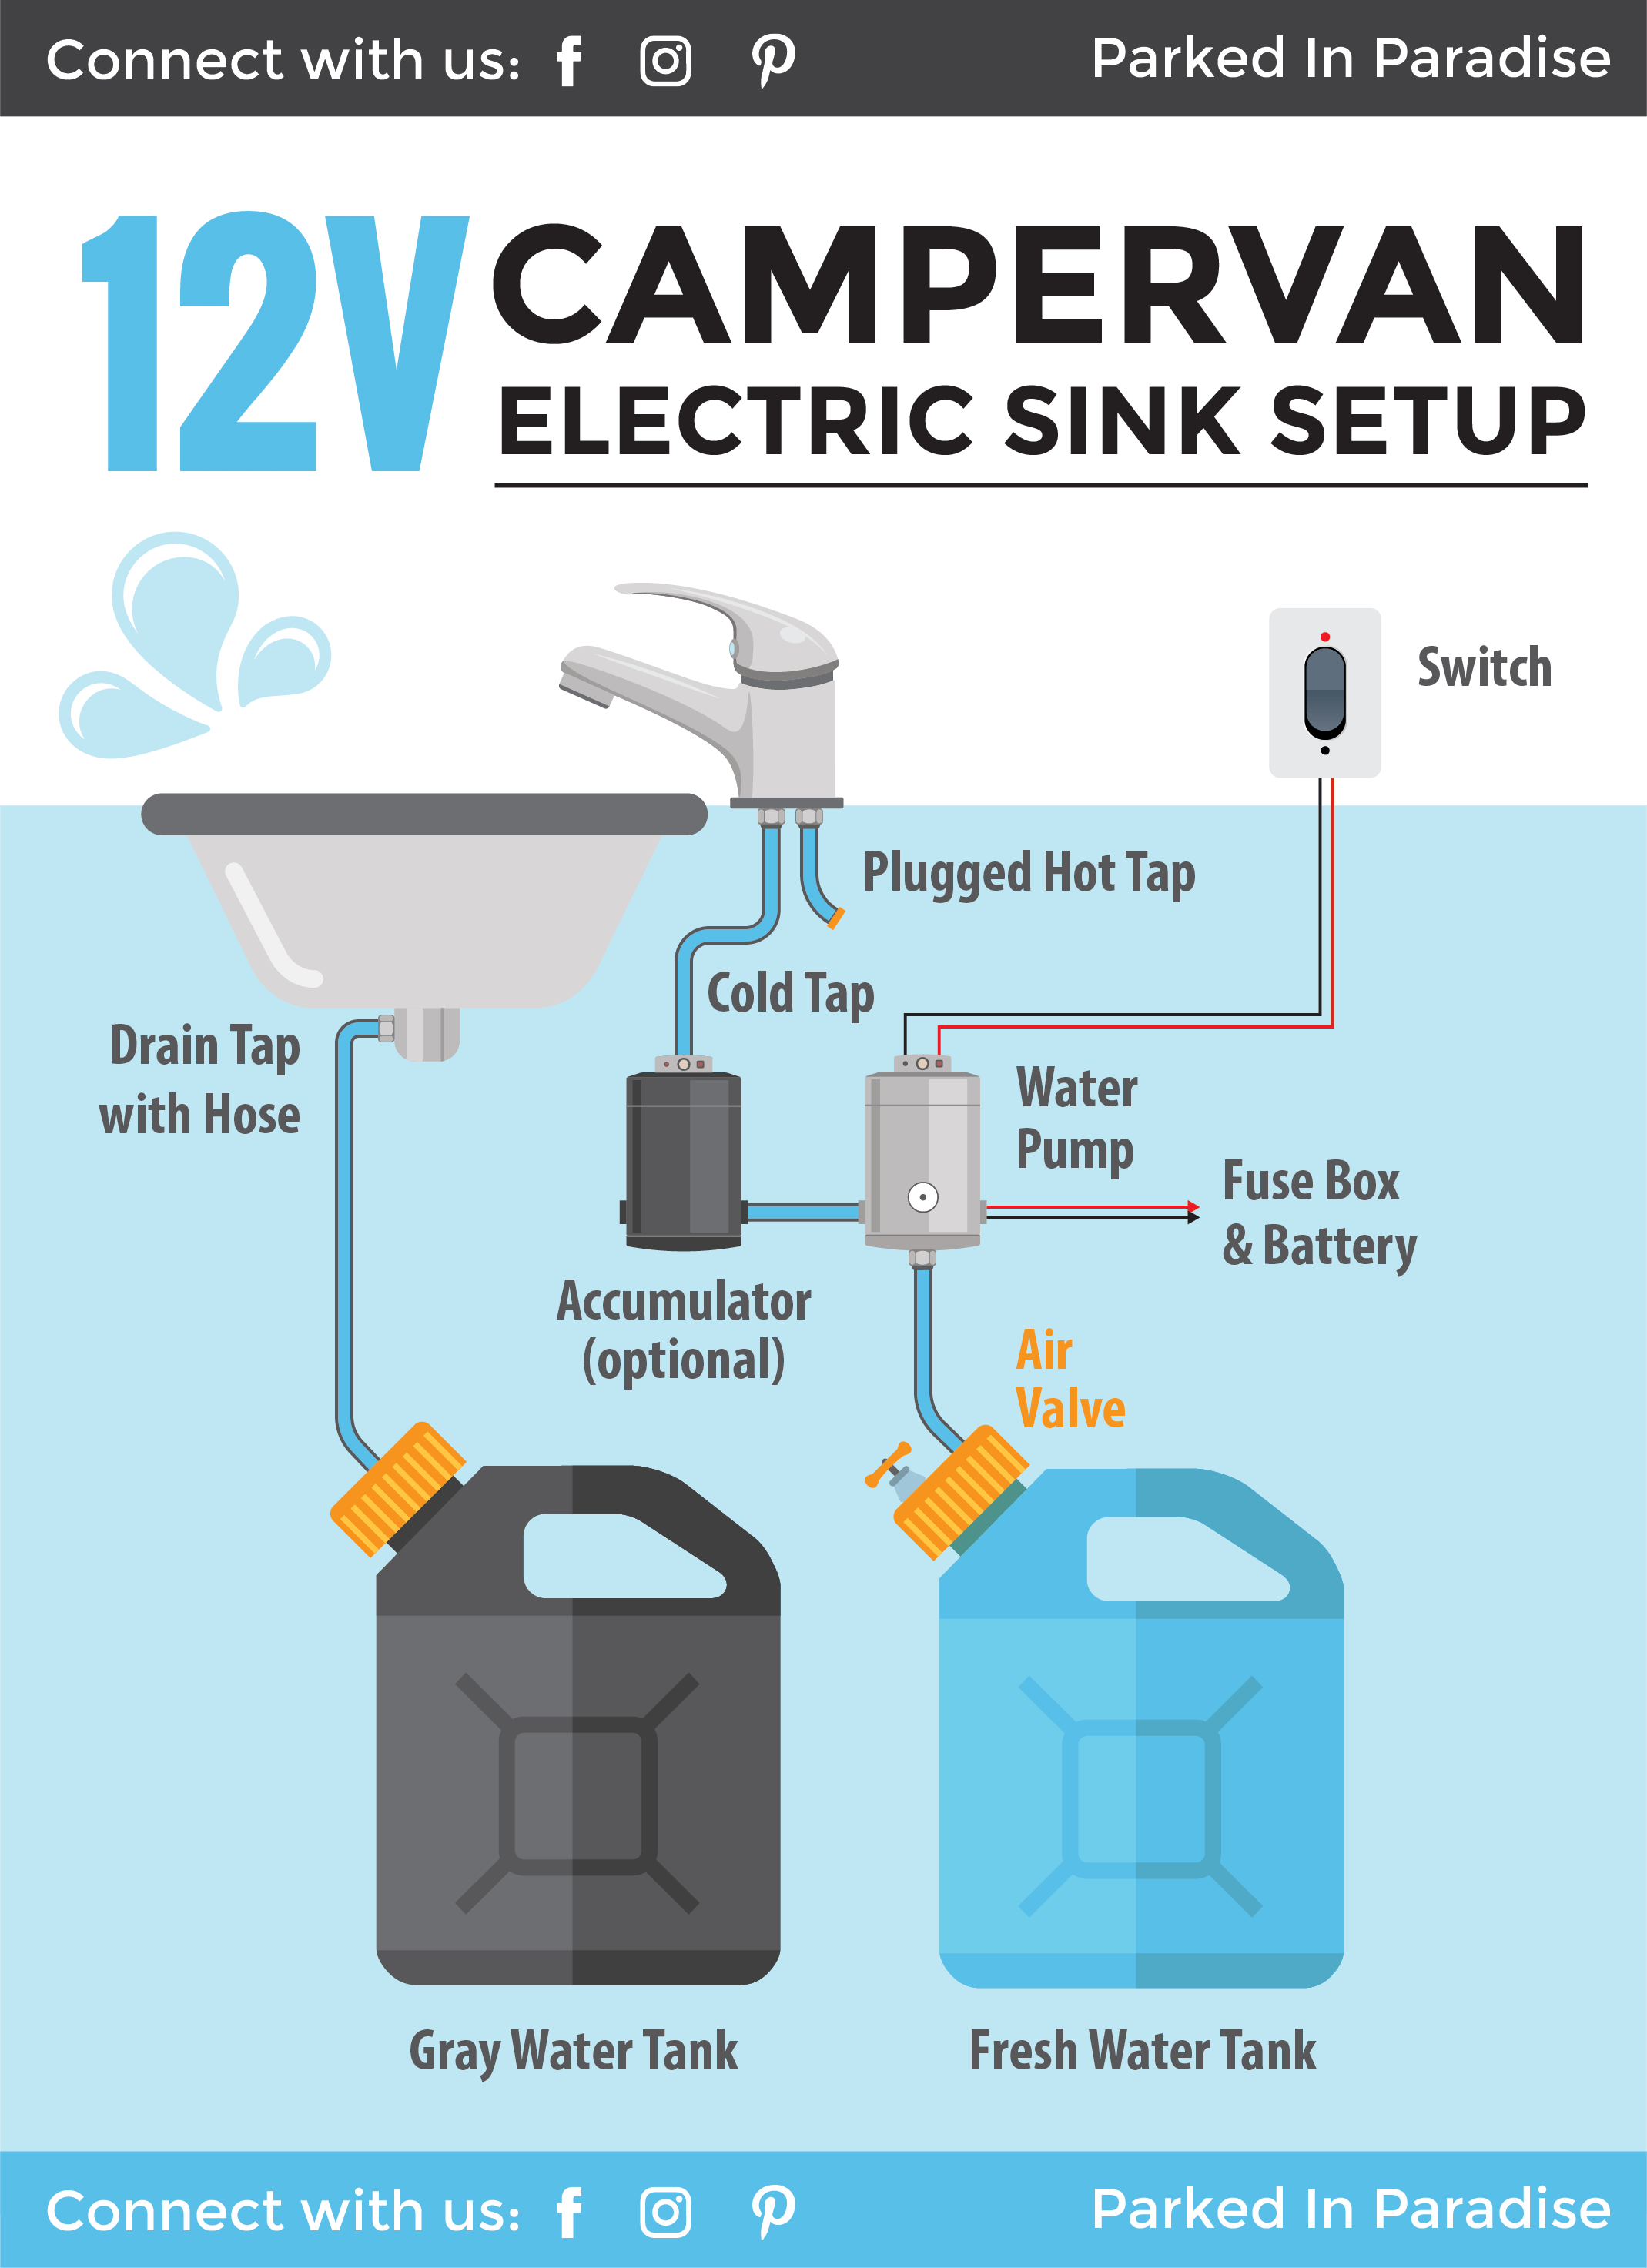
12V Electric Sink Installation
Water Tanks
A key part of any water system are the water tanks. You will want to secure your tanks under the sink or in a safe spot where they cannot move around while driving. The fresh water tank should have two openings, one for the air valve, and one for the tubing to supply the sink. An optional fill hole can be added as well.
The gray water tank will only need one opening for the waste water tubing.
Sink with Faucet
Depending on which type of faucet you choose to purchase, there will either be one water tap or two. Regular household faucets come with a tap for hot water and a tap for cold. In the example installation above, we are not including a hot water heater so only one tap will be necessary. Plug off the hot water tap with a plug that fits your diameter tube.
Fun tip: you can install an pull-out sprayer faucet near a door or window to double as a portable shower!
Strainer Drain
You can choose to purchase a campervan specific sink and drain combo or build your own DIY sink using a metal bowl and steel strainer drain.
Drain Tap with Hose
In a campervan, a camp sink trap acts like a mini-version of the larger U traps under a household sink. The purpose of this is to pool a little bit of water creating a seal that keeps odors from passing through.
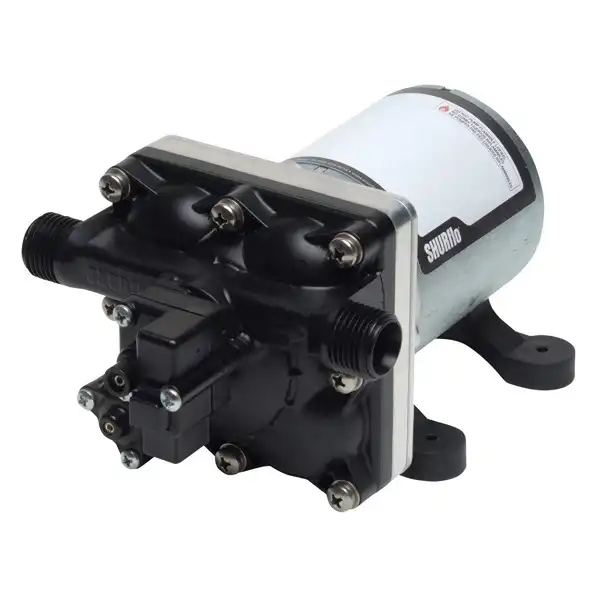
Reliable and long-lasting, the Shurflo 4088 pumps 3GPM at 55PSI and uses 7.5 amps.
12 volt water pump
This is the lifeblood of the sink that is going to do all the manual work for you. Shurflo makes a popular water pump that can pump 3-gallons of water per minute. It draws a maximum of 7.5A when running. This specific pump comes with 16AWG wire that should be run to the fuse block with a 10A fuse.
Read our post on Best 12 volt Electric Sink Pumps for a Camper!
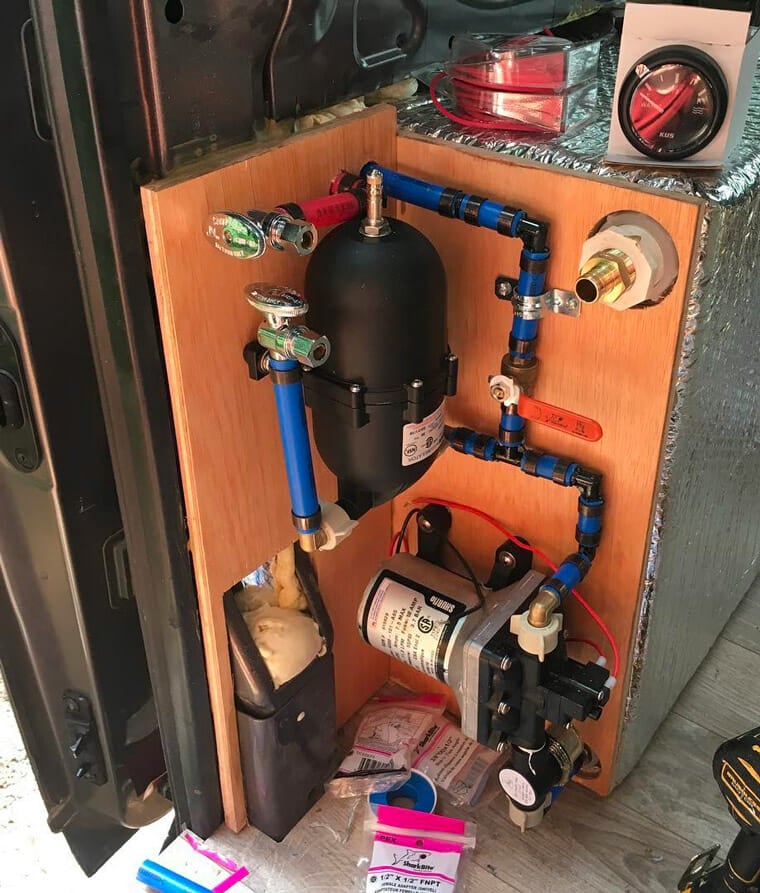
Accumulator (optional)
One of the complaints of 12V water pumps is that they can be quite noisy when turned on. Because of this, you will not want to have the pump on all the time (not to mention the energy savings). Accumulators act as a pressure chamber storing a small amount of water each time the water pump is turned on. This means the sink can still run later when the motor is off. Using the sink without the pump will be a huge advantage in the middle of the night!
A larger accumulator will give you more water during the periods in which the pump is off. Accumulators also make the faucet stream run more steadily. An electric pump in itself might give off a choppier water source as it works to pump.
Although this part is optional, because accumulators are relatively inexpensive we recommend installing one if you are going the route of an electric sink.
Tubing
Expandable hoses that are lead-free can be difficult to find. We recommend using food-safe tubing for your plumbing.
Switch
You will want to install the switch in an easy-to-reach area so your motor doesn’t have to be on 100% of the time. This can also serve as an emergency shut-off in the event that there are any leaks.
Connecting Your Water Systems
The connections between your tubing and water system components are going to vary greatly depending on what you buy. If you choose to purchase camper specific parts and standard sizing as listed above, there shouldn’t be too much extra construction involved.
If you are manipulating your water tanks with custom connections there are a few tips to follow:
- Plastic fittings should be used in place of metal fittings so the treads do not damage the tubes
- Plastic thread sealant should be used for sealing threads (use a sealant not a lubricant!)
- Hose clamps can be placed on top of the tubes to keep everything tight
- Lightweight
- Features a safety shut off
- Easy to connect to any standard hose
Adding A Hot Water Heater
You’ve made it this far and should have a good idea of how to install a cold water sink. But what about hot water? Well, things get a little more complicated from here… but not much! First you need to ask yourself, what are you going to be using hot water for? Chances are you either:
- Just want a hot shower
- Want a hot shower and a hot water tap on your sink
If you just want a hot shower, read our post on portable hot water heaters. This is basically a standalone shower-in-a-box. They cannot be incorporated into a sink setup because they come with their own water pump, tubing, faucet, shower head and heater. This is the best solution if you want a shower that is portable, and requires little-to-no construction. Just plug it in and shower!
If you want to incorporate a hot water heater into your existing 12V sink system, read our post on installing a hot water heater. In that post we talk about how hot water heaters work, and give a nice little graphic like the ones above showing exactly how to hook everything together.
What a great guide! I’m looking to convert a van soon.
Thank you, thank you, thank you for sharing this info and building this diagram. This is going to make my van conversion much easier!
Love this!
LOVE how simple you’ve laid it out!
This is THE most perfect directions on this EVER!!! I completely understand how to do this now!! Thank you!!
Thank you!! I was surprised at how little information there was on this topic when I started researching myself 🙂
Your guide is well written and incredibly informative. I have a question for the forum.
I want to connect two water containers together and then to a foot pump. My space is limited to two small containers, like the Reliance 3 gallon container, on their side w the screw on cap lower on the container side. I thought of connecting the containers w hose thru the caps but wonder if a foot pump would be enough suction to empty one container into the other. Any suggestions?
Have both tanks full but only drill hole in one of the tank lids. Once you have used the water in one tank, simply switch the lids. The lid that connects the water will then be transferred to the full tank. Saving you time and potential mess.
Dude. You guys are awesome. I had no idea what I needed/wanted. Do U have guides and stuff? I’m gonna build soon but a newbie. Feel free to email as well!
Clean install thanks for the write up!
Question for you…the Shurflo manual says do not hook up hard plastic pipes to the inlet/outlet. I am assuming because of noise and vibration.
How much noise/vibration is transmitted through your piping?
Thank you
Super helpful thanks! I am having a heck of a time finding the tank adapters for the host fittings. I need a 2″ one for freshwater with the air valve, and a 3 inch one for the dirty water. Any ideas where I can find these online?
currently working on my own DIY camper van! Thank you for this guide
I see you pictured the water bricks. I love the smaller size, stackability, but I keep hearing about leaks- with the regular lid and the spigot. Do you use this item?
Hey Cyndi, we’ve had our Waterbricks for 4 years now and we love them! So far we haven’t had any issues with leaks. We do store the ones with spigots on them upright while we travel through. I haven’t noticed any leaking with the regular caps stored horizontally but we do screw them on really tight!
Where can I get a cap like those shown in yr diagram? I ordered the water tank from yr link, but it didn’t come with a cap that allows the tube to be inserted.
Thanks!
It is interesting that all you need for a pump to work is tubing and a pumping mechanism. My wife and I have been saving for a van conversion so we can spend some time traveling for a few months. We may consider reaching out to a professional for the plumbing installation.
I reviewed your 12v sink diagram and have a question. The Seaflow 12v rv pop I ordered only has a ground and positive wire. The diagram show two sets of wires coming from the pump. One set to the battery and the other to the switch? Can you clarify?
Jason; Yes you pretty much have it! You will run the ground wire to the negative side of the battery. Hopefully you will be using a bus bar or something similar for this run.
The positive wire will run through the switch to the fuse to the positive side of your battery. This way when you flip the switch, you complete the circuit and the pump turns on. Is that enough info?
Related StoriesMarseille Non merciCrystal Palace star rejected chance to join Marseille and link up .
This is a brilliant guide thanks you for posting.
I saw one of these “Tinton Life Tap” instant hot water taps on a campervan conversion, how would that work? with a mains water pump?
https://www.amazon.co.uk/TINTON-LIFE-Instant-Tankless-Electric/dp/B078HTMNCD
This is great, thank you. Does the drain hose need to have a trap so any outgassing from the gray water stays in the trap? Have you had any issues will the gray water smells? Thanks again.
Hi Kat, yes we recommend a trap, it is mentioned in the article.
There are several steps to bleed air from RV water lines. The first step to dealing with running water lines is to inspect the various components of the RV plumbing system. Fill the RV’s fresh water tank, turn on the motorhome’s water pump, and open the faucet farthest from the pump. Close faucets and other water fixtures and let the water run for a few minutes to a few hours or until the water is even. Repeat this process for each of your faucets and water-using appliances, including showers, bathroom sink faucets, and sprinklers. What you want is to remove all possible air in the lines.
Learning how to bleed air from RV water lines lets you enjoy your RVing experience better. You will not have to worry about sputtering water or insufficient water supply in your kitchen sink, toilet, or shower. Remember, purging air from your system does not require special tools – only a full tank of water.