DIY RV Solar Wiring Diagrams – Installation For Beginners
Are you looking to install solar panels on your RV but don’t know where to start? Well you’ve come to the right place. Whether you are adding panels to a solar-ready RV or building your own DIY system, it all starts with proper planning.
In this article we’ll explain how many solar panels you need, how to connect them, and share wiring diagram examples to get your 12v system up and running in no time. Let’s get started!
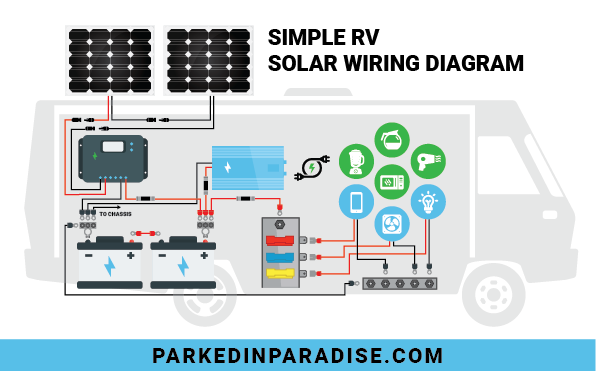
Solar system parts
The most basic RV solar system comes with three main parts: solar panels, a charge controller, and a battery bank.
RV’s that are solar-ready typically come with pre-installed wiring but not the components.
Pre-built RV solar panel kits are a good way for beginners to purchase a semi-complete system that comes with compatible parts.
If you opt for a DIY setup, make sure the items you buy are designed and sized to work together.

Components of a 12v RV solar system:
Solar panels: These sit on the roof and collect energy from the sun. Most RVers use monocrystalline panels, which are more efficient and have a small footprint for tight spaces.
Charge controller: This device controls the flow of electricity from the solar panels to your battery bank. It helps the batteries charge more efficiently and prevents overcharging.
Battery bank: This stores power from the solar panels and makes it available to run electrical appliances at a later time.
Inverter: Converts the power stored in your battery bank from 12v DC (direct current) to AC (alternative current), which can be used to run most household appliances. This is an optional component of your RV solar panel system.
Fuses, connectors, and more: These are the essential items needed to wire your solar system together. Here are some parts to add to your shopping list:
- Solar panel mounts (optional)
- Solar panel extension cable (optional)
- Fuses
- Fuse block + bus bar
- Battery terminal connectors
- Heat shrink tubing
- Battery monitor (optional)
- Electrical wire crimp connector
- Black and red wire (recommend to purchase at hardware store)
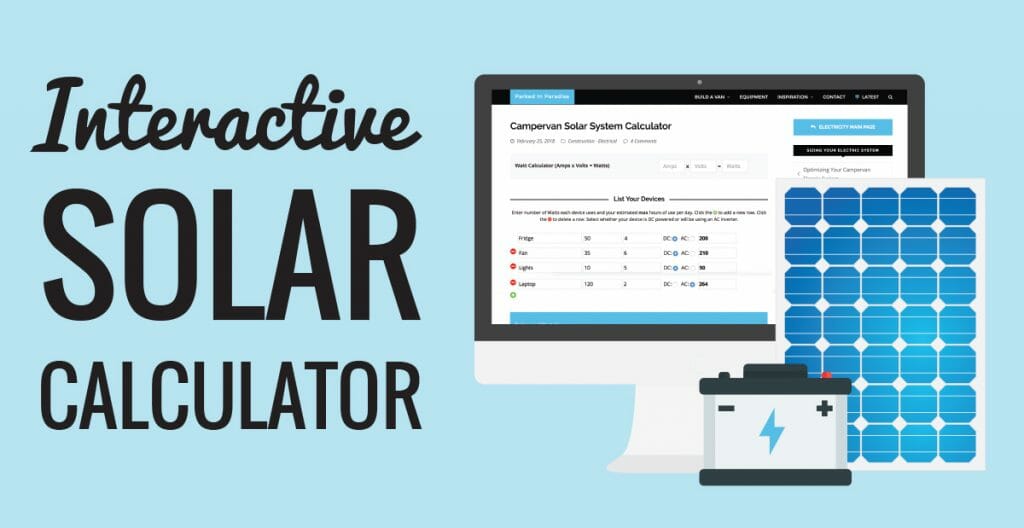
How many solar panels do you need?
We’ve designed an RV solar calculator to walk you through this process. In short, you’ll need to determine which electronic devices and appliances you plan to power with solar, then calculate the total wattage of your system to find out how many panels, and what size battery bank you’ll need to achieve your goals.
The number of solar panels you need depends on how much power you want to generate and how much space you have available.
Generally speaking, the more power your RV needs (measured in Wh, or Watt Hours), the more solar panels you’ll need to install. Here is an example:
100W-200W: Tiny solar system capable of charging just a few devices like cell phones, and lights. Not recommended for RV’s beyond supplementary power.
300W-500W: Medium solar panel system. Capable of charging a portable refrigerator, vent fan, lights, sink pump, laptops and cell phones (within reason). This size system may run out of juice after long stretches of cloudy days or with heavy use.
600W-1000W: Large solar panel system. This size system should be sufficient for boondocking or off-grid living. It can charge an energy-efficient refrigerator, sink pump, vent fans, lights, signal boosters, and other electronics.
1000W+: Extra-large solar system. Capable of charging many power-hungry devices and can be used for off-grid living. This size of system is expensive, and in many cases an RV generator may be a better use of funds.
- Note: running an RV air conditioning system typically requires 1800W of solar or more.
What size wiring to use
To safely wire your RV, you’ll need to use the proper size wire. Generally speaking, the longer your run of wire, the thicker and more robust the wire needs to be in order to handle the increased current.
Wire diameter is measured in AWG (American Wire Gauge). The smaller the gauge, the larger the diameter of the wire. Below is a chart for picking your minimum wire size. To use the chart:
- Calculate how many amps will pass through the wire.
- Measure how far away the component will be from the battery. (The length of your circuit is the total length, meaning double the distance between component and battery.)
- Choose a wire that can handle the amps with a little buffer (25% or so).
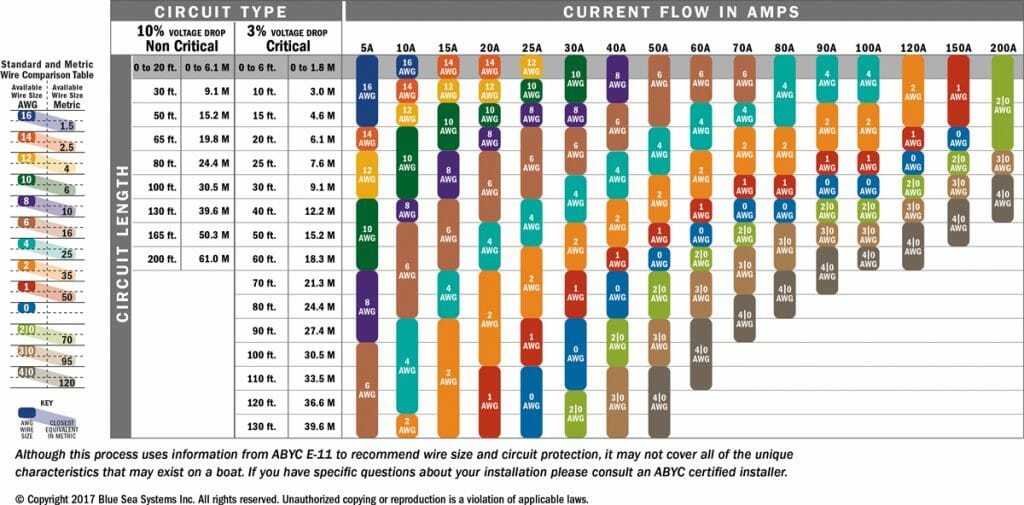
There is no performance downside to getting wire that is larger than required. As a rule of thumb we recommend the following:
- 12 AWG wiring for runs up to 20 feet
- 10 AWG wiring for runs up to 50 feet
- 8 AWG for runs over 50 feet
12 volt wiring tips: Remember a run is double the distance between the component and the battery. It is best to buy multi stranded wire because it’s easier to route and better able to handle the vibrations of a travel trailer. Don’t use solid copper household wiring in an RV (known as Romex).
**We recommend purchasing wiring at a hardware store because it is cheaper and higher quality.
DIY RV Solar Panel Wiring Diagrams
Once you’ve sized your system, it’s time to get started! Below are several 12v wiring diagrams for rv solar panel installation. All of the diagrams demonstrate how to connect the solar panels, charge controller, and battery bank in simple configurations.
If electricity is intimidating to you, it’s best to err on the side of caution and have a professional install your RV solar panel system. They will be able to ensure that all the components are properly connected and that no wiring errors occur that could damage your RV – or worse – you!
100W Solar wiring diagram
A 100W solar system is capable of powering just a few small items like LED lights, a cell phone, and a roof vent. This system is more suitable for camper vans, but a does a good job of providing a bit of supplementary energy on the go.
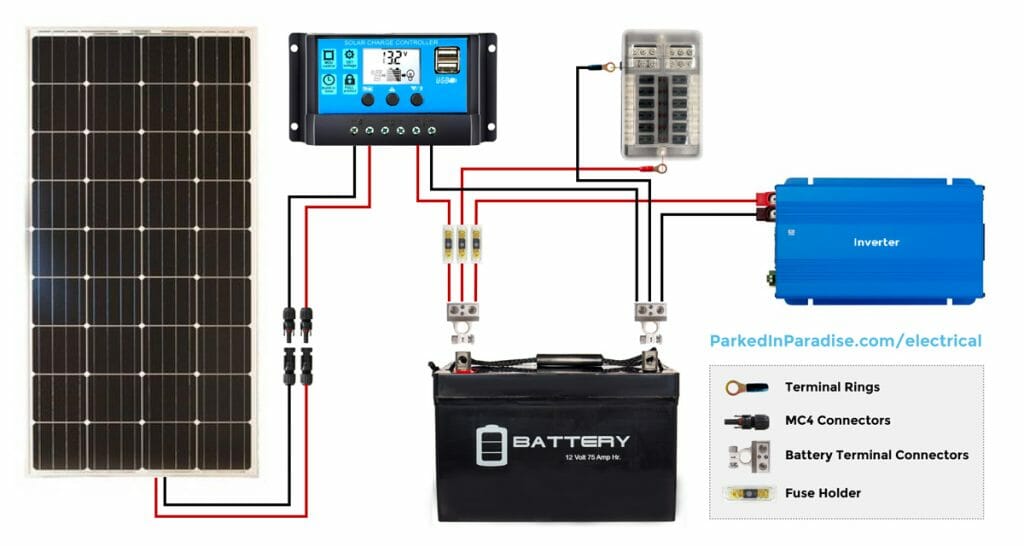
To install your own 100W solar system, you’ll need the following parts:
- Solar Panels (100W)
- Charge Controller
- Batteries
- 75Ah (x1) Battery (AGM option)
- 50Ah (x1) Battery (Lithium option)
- Inverter
- Additional Parts
- Solar panel roof mounting z-rack (optional)
- Adjustable tilt mount (optional)
- 6 circuit fuse block + bus bar
- Battery terminal connectors
- Battery monitor (optional)
- Electrical wire crimp connector
- Solar panel extension cable
- Wires and fuses*
- Alternator Charging (optional – choose one)
- Battery isolator
- B2B charger (solar CC included, incompatible with lithium)
- B2B charger (compatible with lithium)
200W Solar wiring diagram
A 200W rv solar panel system is enough to power small 12v appliances, like a laptop, cell phone signal booster or sink pump, and run several lights. It’s unlikely that you will be able to power a portable refrigerator full-time so this is a good setup for supplementary power.
Check out the wiring diagram for the 100W RV solar panel installation below:
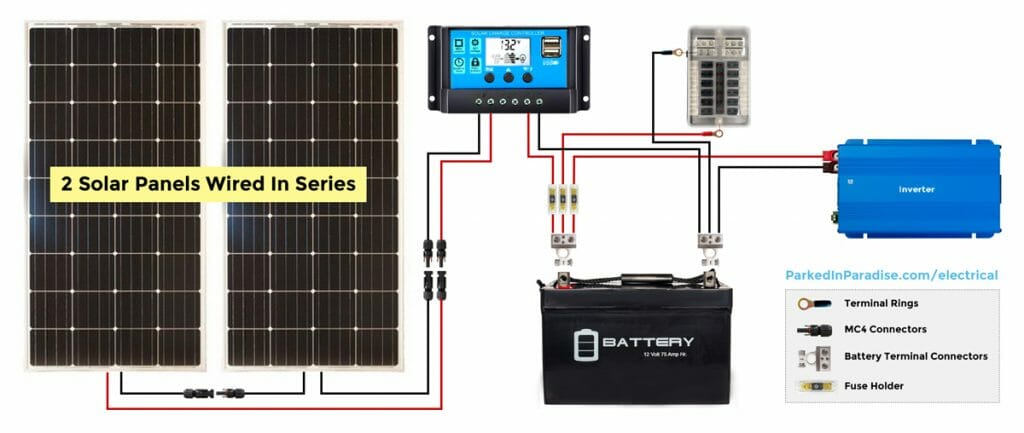
To wire your own 200W RV solar system, you’ll need the following parts:
- Solar Panels (100W)
- Charge Controller
- Batteries
- 200Ah (x1) Battery (AGM option)
- 100Ah (x1) Battery (Lithium option)
- Inverter (use smallest size required)
- Additional Parts
- Solar panel roof mounting z-rack (optional)
- Adjustable tilt mount (optional)
- 12 circuit fuse block + bus bar
- Battery terminal connectors
- Battery monitor (optional – basic)
- Battery monitor (optional – premium)
- Electrical wire crimp connector
- Solar panel extension cable
- Wires and fuses*
- Alternator Charging (optional – choose one)
- Battery isolator
- B2B charger (solar CC included, incompatible with lithium)
- B2B charger (compatible with lithium)
300W Solar wiring diagram
A 300W rv solar panel system can power a variety of appliances including a vent fan, cell phone signal booster, sink pump, laptops and cell phones. In certain conditions, a portable refrigerator can be powered, although you may run into snags on cloudy days when you cannot fully utilize the full power of the sun.
300W is still considered a “small solar system” when it comes to RVs. Most people that choose to go boondocking full-time will want 400W or more. However, many van life travelers can easily get away with only 300W of solar because their motorhomes are so minimalistic and small.
See the 12v rv solar panel installation wiring diagram for a 300W system below:
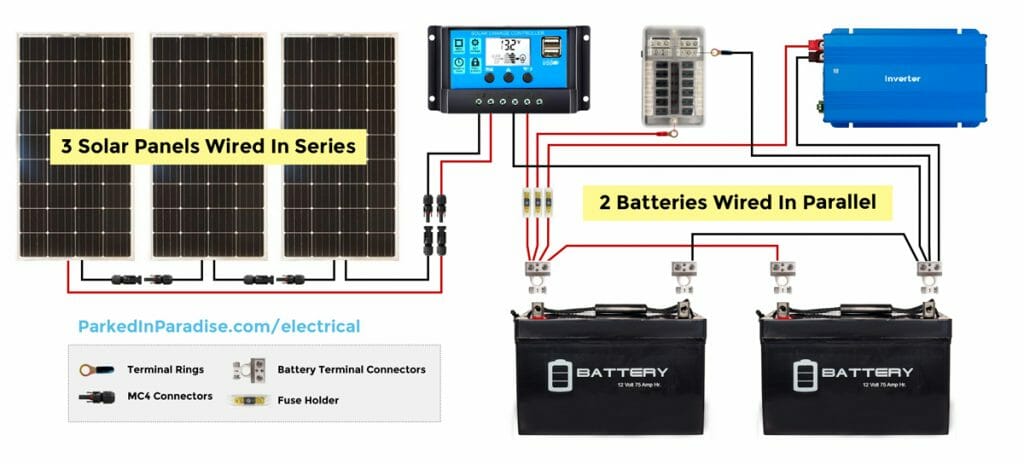
Here is a list of parts needed for a 300W solar system:
- Solar Panels (300W)
- Charge Controller
- Batteries
- 150Ah (x2) Battery (AGM option)
- 100Ah (x1) Battery (Lithium option)
- Inverter (use smallest size required)
- Additional Parts
- Solar panel roof mounting z-rack (optional)
- Adjustable tilt mount (optional)
- 12 circuit fuse block + bus bar
- Battery terminal connectors
- Battery monitor (optional – basic)
- Battery monitor (optional – premium)
- Electrical wire crimp connector
- Solar panel extension cable
- Wires and fuses*
- Alternator Charging (optional – choose one)
- Battery isolator
- B2B charger (solar CC included, incompatible with lithium)
- B2B charger (compatible with lithium)
400W Solar wiring diagram
400W-600W is considered a medium-sized solar system when it comes to RVs and travel trailers. With this much power you can run a portable refrigerator, vent fan, and several other small electronic devices.
This amount of power should be sufficient for dry camping full-time provided you are careful with your power consumption and don’t do anything crazy like try to run an air-condioner.
The rv solar panel wiring diagram for 400W system looks like this:
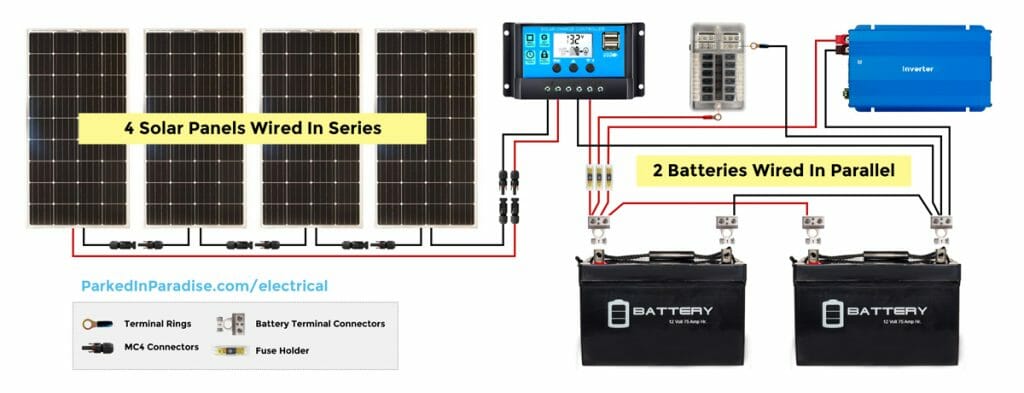
Here is a list of parts needed for a 400W solar system:
- Solar Panels (400W)
- Charge Controller
- Batteries
- 200Ah (x2) Battery (AGM option)
- 100Ah (x2) Battery (Lithium option)
- Inverter (use smallest size required)
- Additional Parts
- Solar panel roof mounting z-rack (optional)
- Adjustable tilt mount (optional)
- 6 way fuse block + bus bar
- Battery terminal connectors
- Battery monitor (optional)
- Electrical wire crimp connector
- Solar panel extension cable
- Wires and fuses*
- Alternator Charging (optional – choose one)
- Battery isolator
- B2B charger (solar CC included, incompatible with lithium)
- Battery isolator (compatible with lithium)
- B2B charger (solar CC included, compatible with lithium)
Large RV solar wiring diagrams (400W or more)
When it comes to large RV solar systems (400-watts or more) there are some variances between how the batteries should be wired.
- RV campers with AGM batteries will benefit from wiring their bank in series.
- RV campers with Lithium batteries will benefit from having their battery bank wired in parallel.
Below are two examples of how to achieve this method:
Large RV solar wiring diagram with AGM batteries
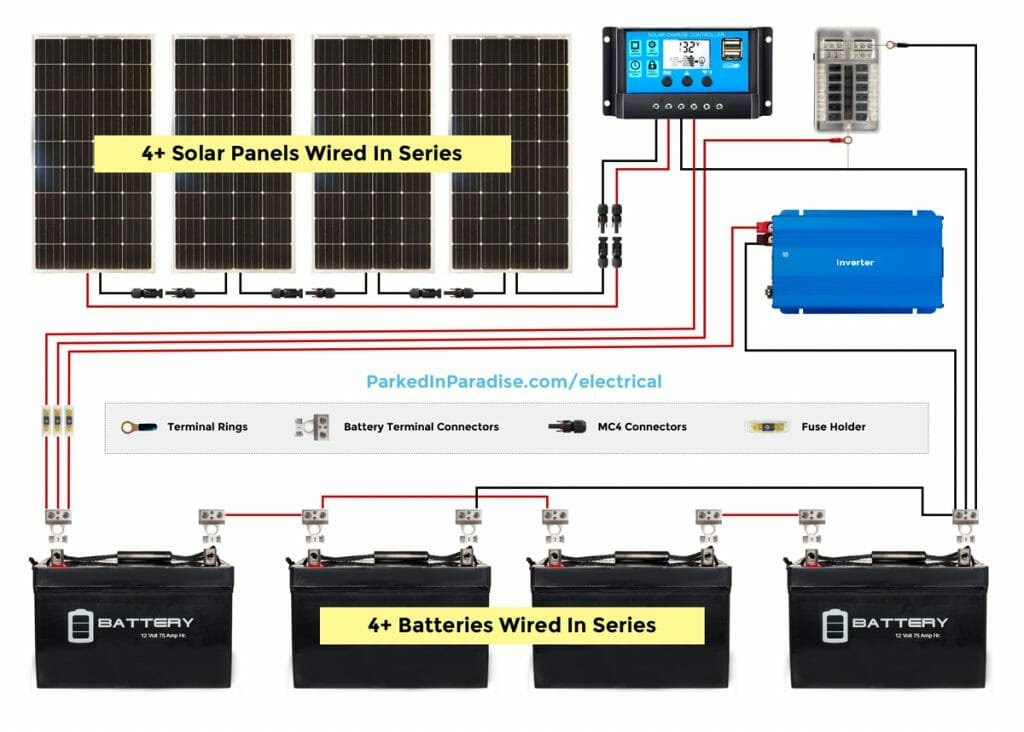
Use the following parts to wire your system:
- Solar Panels
- Charge Controller
- Batteries
- Inverter (use smallest size required)
- Additional Parts
- Solar panel roof mounting z-rack (optional)
- Adjustable tilt mount (optional)
- 6 way fuse block + bus bar
- Battery terminal connectors
- Battery monitor (optional)
- Electrical wire crimp connector
- Solar panel extension cable
- Wires and fuses*
- Alternator Charging (optional – choose one)
- Battery isolator
- B2B charger (solar CC included, incompatible with lithium)
- Battery isolator (compatible with lithium)
- B2B charger (solar CC included, compatible with lithium)
Large RV solar wiring diagram with Lithium batteries
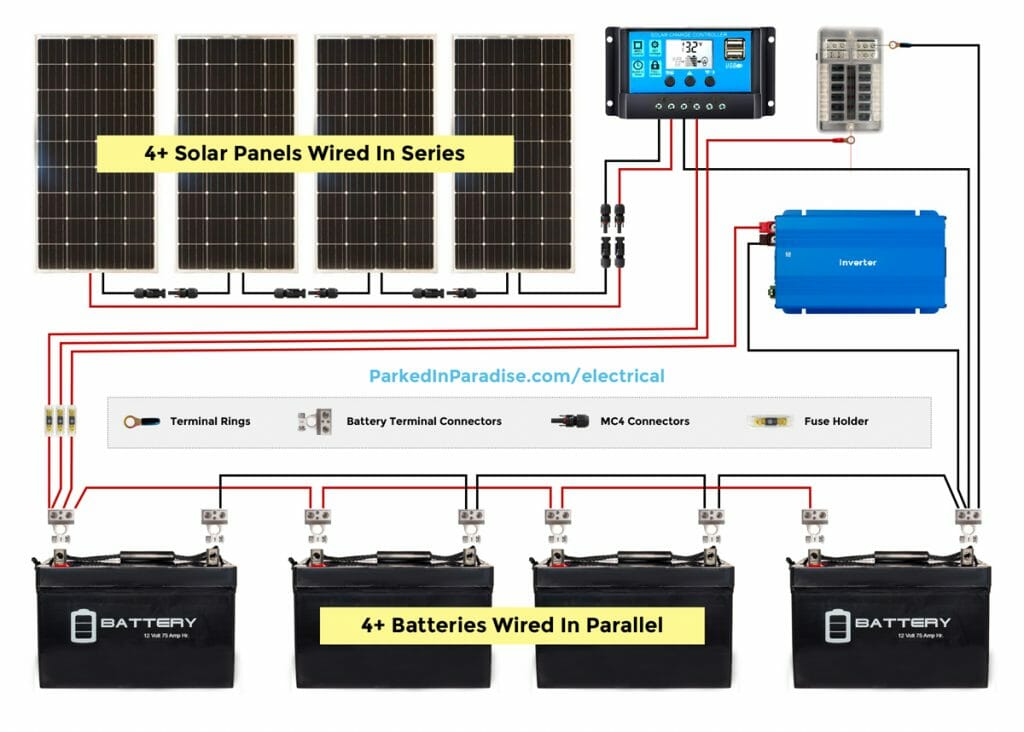
Use the following parts to wire your lithium battery solar system:
- Solar Panels
- Charge Controller
- Batteries
- Inverter (use smallest size required)
- Additional Parts
- Solar panel roof mounting z-rack (optional)
- Adjustable tilt mount (optional)
- 6 way fuse block + bus bar
- Battery terminal connectors
- Battery monitor (optional)
- Electrical wire crimp connector
- Solar panel extension cable
- Wires and fuses*
- Alternator Charging (optional – choose one)
- Battery isolator
- B2B charger (solar CC included, incompatible with lithium)
- Battery isolator (compatible with lithium)
- B2B charger (solar CC included, compatible with lithium)
How to wire an RV solar system
Installing RV solar panels isn’t rocket science, but it does require some electrical knowledge. Here are the steps for wiring your 12v solar panel system:
- Mount the RV solar panels to the roof. Decide wether these should be wired together in series or parallel.
- Attach the charge controller to the inside of the RV near the battery bank.
- Run wires from the solar panels to the charge controller with a circuit breaker or fuse in-between. (Do not connect your solar panels yet).
- Connect the charge controller to the battery bank (don’t forget the fuse!)
- Before plugging in the solar panels, double-check that all wiring and fuses are in-place and properly connected. There should be a fuse on every positive wire. Pay special attention to the polarity of the system because many solar-ready RVs will switch the polarity.
- Connect the solar panels.
- Caulk and seal any holes or exposures created during the installation process.
- If using an inverter, it should be mounted as close to the battery bank as possible.
What are fuses
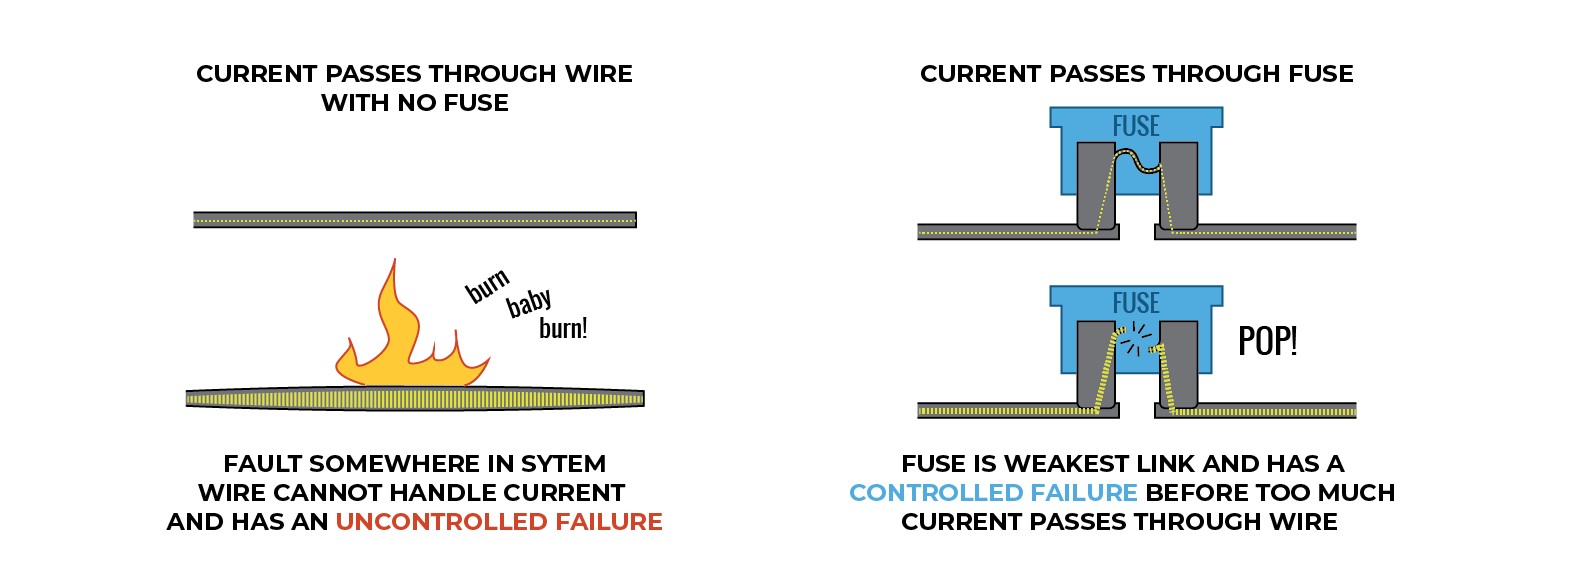
A fuse’s primary purpose is to protect the wiring and prevent fires. Fuses should be used on all positive (+) wires.
Fuses come in all shapes and sizes, but functionally they all work the same way. They have a small element in them that will break when too many amps pass through:
Fuse blocks and bus bars
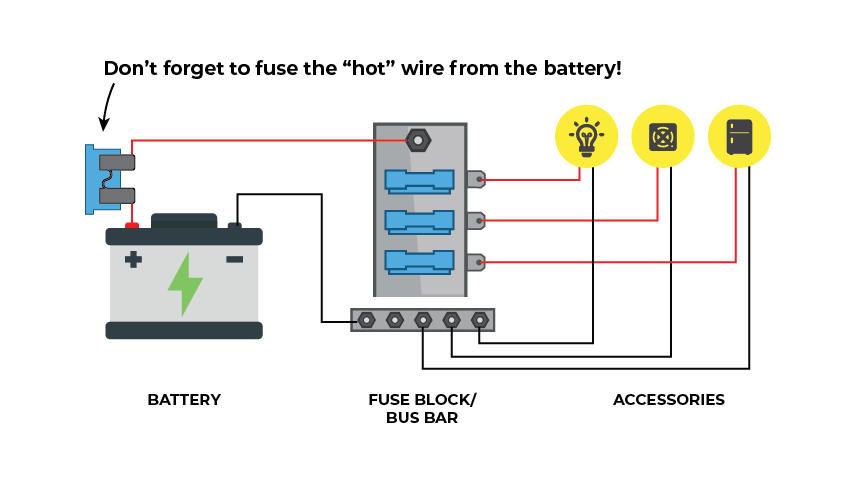
A 12v fuse block should be used in-between the battery bank and your 12v electronics (like lights, fans, and other accessories). They keep the power organized and eliminate the mess of dangling wires.
A 12v bus bar is essentially a piece of metal to attach all of your return negative (-) wires to. Many fuse blocks a bus bar built-in. This is cleaner for circuits because the power is all passing to the battery at the same point.
Some people install breakers instead of fuses. Breakers are helpful in larger systems when circuits need to be turned off for repairs.
Fuse sizing and installation
Most manufacturers have a recommended fuse size listed in the owner’s manual. On a charge controller for example, there may be a chart that includes “Recommended DC Fuse” so just use that.
If there is no recommendation listed, this is how you determine the fuse size:
Find out the Amps or Watts of the device.
- For Amps, choose the next fuse size up:
- Part is rated at 12V and 9.2 Amps. So use a 10 amp fuse.
- For Watts, divide wattage by voltage then size up:
- 100 Watt device divided by 12V = 8.3 Amps. So use a 10 amp fuse.

Fuse installation tips:
- Never install a fuse that is larger than the current rating for the wire. Smaller is fine. Use the wire chart above to determine your maximum fuse size. This should not exceed 150% of the max wire ampacity.
- Install the fuse as close to the battery (or “hot” end) as possible. This way if the fuse operates, there will be less wire that can still carry power.
- Fuse all circuits that can have power running through them. A circuit is the full (+) to component to (-) loop. No fuse is needed on the (-) return wire for a 12 volt system.
Terminals and crimping
Terminals are simply another name for a connector at the end of a wire. They can be safely used to connect all the wires in your system together.
Above is a quick video on how to crimp terminals. A basic stripper and crimper is OK for this kind of project.
For any wire thicker than 8 AWG it’s recommended to buy wire with terminals pre-installed or have them installed at a battery store. It takes an additional special crimper tool to apply enough pressure to attach larger terminals.
Make sure to use a connector that is appropriate for the wire size. They are usually labeled.
When attaching cables to your battery or frame, you want the electricity to flow through as few surfaces as possible. This means that you don’t want to sandwich any washers between the connecting surfaces (but above them is fine).
FAQ
No, you do not need to disconnect the converter. However, it is recommended that you install a transfer switch so you can control when your rv solar panels are connected to the battery bank. This ensures that your rv solar panel system and RV’s electrical system don’t interfere with each other.
No, portable rv solar panels can be used if space is limited. However, mounting your rv solar panel system to the roof will provide maximum sun exposure and ensure that you are getting the most out of your rv solar panel system.
No, you do not need to use rv-specific solar panels. However, rv-specific solar panels are designed to be smaller and have a lower voltage rating so they are more compatible with other RV components.
If your RV is solar-ready, you can follow these steps to install your solar panel system.
And that’s all there is to it! With a bit of patience and persistence you can have your 12v RV solar panel system installed in no time. Remember to check each connection for accuracy, or hire a professional if you’re feeling overwhelmed. Happy travels!
